


Activating Hidden 1-second Tracklog Function In Nuvi 2xx
Moderators: Moderators, Regional Mappers
Forum rules
1. Be nice to each other and respect the moderators. Post in normal font size, color and weight. Follow Nettiquette
2. NO out of topic. Discuss about GPS device only
3. NO abuse, profanity and insults
4. NO spamming, cross posting and opening of duplicate topics
5. NO advertisement post or link
6. NO post/link to warez, cracks, serials or illegally obtained copyrighted content
7. Each message posted is owned by and is the opinion of the original poster. Neither mfm nor its owner or moderators are legally responsible for anything posted on the forum
Re: Activating hidden tracklog function in Nuvi 2xx
OK, please do it.
-
WeiQi00

- Polygon Mapper
- Posts: 158
- Joined: Wed Sep 17, 2008 10:44 am
- Location: Johor Bahru [60CSx + Nuvi 200w]
Re: Activating hidden tracklog function in Nuvi 2xx
Previously, I bought Nuvi 200w US version with Software version 2.70, which has hidden tracklog feature.
Use not even one month, Auto shutdown itself and unable to power On.
Brought back to the vendor, he replaced a new set of Nuvi 200W for me, US version also but software version is 3.40.
It without hidden tracklog feature](./images/smilies/eusa_wall.gif "Brick wall") .
.
I still remembered, many month ago. I did send a mail to Mr.neadrenalin,
he replied me that All the firmwares in nuvi 200/200w and 7xx line have hidden tracklog. All menus can be activated by patching firmware code. Sometimes garminz created test backdoor (such as nuvi 200w id0737 or 200 id0660) and everybody can use is by reverting to version with backdoor and then upgrading.
But My nuvi 200w ID is 835, Mr.neadrenalin told me that ID835 no firmware to revert.
After that, I am no more log on to GpsPassion.
Thanks to Jason open this thread and remind me.
Just log on to Gpspassion
Yes, Mr.neadrenalin has already Get the Gupdate.gcd for ID835, and he already patching the firmware code.
Will try it later.
Use not even one month, Auto shutdown itself and unable to power On.
Brought back to the vendor, he replaced a new set of Nuvi 200W for me, US version also but software version is 3.40.
It without hidden tracklog feature
.I still remembered, many month ago. I did send a mail to Mr.neadrenalin,
he replied me that All the firmwares in nuvi 200/200w and 7xx line have hidden tracklog. All menus can be activated by patching firmware code. Sometimes garminz created test backdoor (such as nuvi 200w id0737 or 200 id0660) and everybody can use is by reverting to version with backdoor and then upgrading.
But My nuvi 200w ID is 835, Mr.neadrenalin told me that ID835 no firmware to revert.
After that, I am no more log on to GpsPassion.
Thanks to Jason open this thread and remind me.
Just log on to Gpspassion
Yes, Mr.neadrenalin has already Get the Gupdate.gcd for ID835, and he already patching the firmware code.
Will try it later.
Our maps are FREE but we need funds to keep this site going. Please support our HOSTING FUND 
Thanks for your support.

-
WeiQi00
- Polygon Mapper
- Posts: 158
- Joined: Wed Sep 17, 2008 10:44 am
- Location: Johor Bahru [60CSx + Nuvi 200w]
Re: Activating hidden tracklog function in Nuvi 2xx
Yes. Done  [ took just 5 mins to completed ]
Thanks to Mr.neadrenalin & Jason lee.
Now My Nuvi200w with Hidden tracklog feature + latest Software version.
[ took just 5 mins to completed Thanks to Mr.neadrenalin & Jason lee.
Now My Nuvi200w with Hidden tracklog feature + latest Software version.
You do not have the required permissions to view the files attached to this post.
Last edited by WeiQi00 on Sun Jan 18, 2009 8:26 pm, edited 3 times in total.
Our maps are FREE but we need funds to keep this site going. Please support our HOSTING FUND Thanks for your support.
-
JasonLee

- Regional Mapper
- Posts: 503
- Joined: Thu Sep 18, 2008 11:54 pm
- Location: Penang (Magellan Meridian Color & Garmin Nuvi 1460, 2465, 2575R, 3560 & Etrex 30)
Re: Activating hidden tracklog function in Nuvi 2xx
First of all, credit and thanks must be accorded to neadrenalin of gpspassion for writing the Firmware patches and popej of garniak.pl for writing the wnutrak.exe software to convert the tracklogs to gdb files which Mapsource can read.
Before you get all excited and start patching your GPS units, here are some words of caution. If you patch your unit with FW patches written for different Hardware IDs (HWID), your unit may be permanently damaged. It is prudent that you fully backup everything in your GPS unit before you begin flashing your FW even if it is written for your HWID.
Patches are currently available to enable this function for HWID 0737 & 0835 for 2xxW and 0834 & 0660 for 2xx Nuvi's. HWID 0760 for Nuvi 2xx and 0754 for Nuvi 7x0 are in progress and not yet available. Taiwanese Nuvis (with HWID = 0760 & 0780) are not yet patchable so you have to wait longer. There is no mention of Indon Nuvis.
URLs to download the patches:
HWID = 0660 http://e-trex.info/fw/nuvi/2xx/fw_nuvi2 ... acklog.rar
HWID = 0737 http://e-trex.info/fw/nuvi/2xxW/fw_nuvi ... acklog.rar
HWID = 0834 http://e-trex.info/fw/nuvi/2xx/fw_nuvi2 ... acklog.rar
HWID = 0835 http://e-trex.info/fw/nuvi/2xxW/fw_nuvi ... acklog.rar
The easiest way to determine your HWID is to connect your GPS to your PC then look into the Garmin folder in the unit (not the memory card). You will find a file GarminDevice.xml. Open it and you should see the Part Number which tells you the HWID. My Part Number is <PartNumber>006-B 0660 -00</PartNumber> so my HWID is 0660. I am not sure whether you need to update your firmware to the above-mentioned versions first or that the patch will do it for you. Since my FW is already 5.00, it worked so if I were you and my unit is not updated to 5.00 or 4.00, I would have it updated first. When you have determined that your unit can be patched (having the above HWIDs) here are the steps to patch your unit.
The first thing to do is to connect your GPS by USB cable to your PC and allow your OS to install the necessary drivers if you have not done so before. Next, as a precautionary step to avoid update or patch failure is to delete the file GUPDATE.GCD from the \Garmin folder in your GPS. Unzip the downloaded patch which will contain 3 files: HWID01000500.rgn; readme.txt & Updater.exe. The Updater.exe must be run while your unit is in the pre-boot mode.
There are 3 ways to get to the pre-boot mode:
1. Move the power switch of your unit to ON and hold it for more than 30 seconds. You are in the pre-boot mode when you see the LOADER message. Keep holding the switch to ON and connect your USB cable. Wait for 3-5 seconds or longer for your PC to recognise your unit. After the drivers are loaded, run the updater.exe file and release the switch only when you see data being transferred from your PC to your unit. Wait for the LOADING or flashing to complete uninterrupted.
2. This applies to my unit as I get a calibration screen inviting me to press the dot when I held the power switch for 45 seconds. For such units, hold the switch for only 5 seconds then connect the USB cable, wait for 3-5 seconds or longer for your PC to recognise your unit. After the drivers are loaded, run the updater.exe and release the switch only when you see data being transferred to your unit. Wait for the LOADING or flashing to complete uninterrupted. If the calibration screen comes on before you can run the updater.exe, switch off the unit and start over.
3. If the above 2 methods do not work, instead of the pre-boot mode, you can also update in the diagnostic mode. Switch on normally and then touch the battery icon for 10 seconds for the unit to get into the diagnostic mode. (Incidentally, you can charge your battery with your PC using a USB cable if you plug the USB cable in when the unit is in the diagnostic mode.) Then connect the USB cable, wait for 3-5 seconds or longer for your PC to recognise your unit. After the drivers are loaded, run the updater.exe Wait for the LOADING or flashing to complete uninterrupted.
When loading of the patch firmware is complete, you can start your unit normally.
At the map screen, touch the Speed window, at the bottom left-hand corner.
This will be the resultant screen:
Now touch the speedometer window and you will get to this screen:
Touch the next button and you will see something you have never seen before:
The Start Recording Button is only active when you are logged on to the satellites i.e. ready to navigate.
There will be a <STOP> button on your map screen for you to touch any time you wish to stop the recording. You will not see your track displayed on the map.
After the recording is completed, you can either go back to the Logging Control screen and touch on the Start Playback button or connect your GPS once again to your PC to convert the tracklog to gdb files for your MapSource to display. When you touch the Playback button, you will see a replay of your track at the speed and actual time you took to record the track.
To convert the recorded data into gpx files that MapSource can read, go to http://translate.google.com and translate from Polish to English the following URL: http://www.garniak.pl/viewtopic.php?f=14&t=4835
Download the wnutrak015.zip from the link provided which is the required software to do the conversion.
The GUI of wnutrak.exe is very simple and all you got to do is specify the INPUT folder on your GPS unit (connected to your PC). Typically it should be <Drv>:\Garmin\Logs depending on which drive letter your OS has assigned to your GPS unit. For OUTPUT, firstly create a folder in your PC to store your gdb track files and then select that folder. You will not be able to name the gdb file at this stage as that is automatically named based on the date and time info. You can change the filename to whatever you wish when you open it in MapSource.
I hope this explanation is clear enough. Have fun.
You do not have the required permissions to view the files attached to this post.
Last edited by JasonLee on Sat Feb 21, 2009 10:46 pm, edited 3 times in total.
Lean not on your own understanding
Re: Activating hidden tracklog function in Nuvi 2xx
JasonLee wrote:2. This applies to my unit as I get a calibration screen inviting me to press the dot when I held the power switch for 45 seconds. For such units, hold the switch for only 5 seconds then connect the USB cable, wait for 3-5 seconds or longer for your PC to recognise your unit. After the drivers are loaded, run the updater.exe and release the switch only when you see data being transferred to your unit. Wait for the LOADING or flashing to complete uninterrupted. If the calibration screen comes on before you can run the updater.exe, switch off the unit and start over.
Hi jasonLee,
Got mine done.
Your explanation is much clearer than neadrenalin of gpspassion.
I took about 20mins using method 2 as elaborated by you. Initially I had difficulties in getting the UPDATER.EXE to recognise the device connected via USB.
What i did was to run the UPDATER.EXE first, and follow your instructions, and as soon as the UPDATER.EXE detect the device via USB, quickly press OK, and as soon as the LOADING is in progress, i can release the ON button on the 200W.
Thanks for your effort, probably I will drive around later to test out this new function. Cheers
Contribute exclusively to MFM. MSM don't get it !
-
JasonLee
- Regional Mapper
- Posts: 503
- Joined: Thu Sep 18, 2008 11:54 pm
- Location: Penang (Magellan Meridian Color & Garmin Nuvi 1460, 2465, 2575R, 3560 & Etrex 30)
Re: Activating hidden tracklog function in Nuvi 2xx
I am very encouraged by the quality of the track my Nuvi200 recorded this afternoon while hiking up Penang Hill.
As you can see, the track points are spaced about 10m apart.
As you can see, the track points are spaced about 10m apart.
You do not have the required permissions to view the files attached to this post.
Lean not on your own understanding
-
JasonLee
- Regional Mapper
- Posts: 503
- Joined: Thu Sep 18, 2008 11:54 pm
- Location: Penang (Magellan Meridian Color & Garmin Nuvi 1460, 2465, 2575R, 3560 & Etrex 30)
Re: Activating hidden tracklog function in Nuvi 2xx
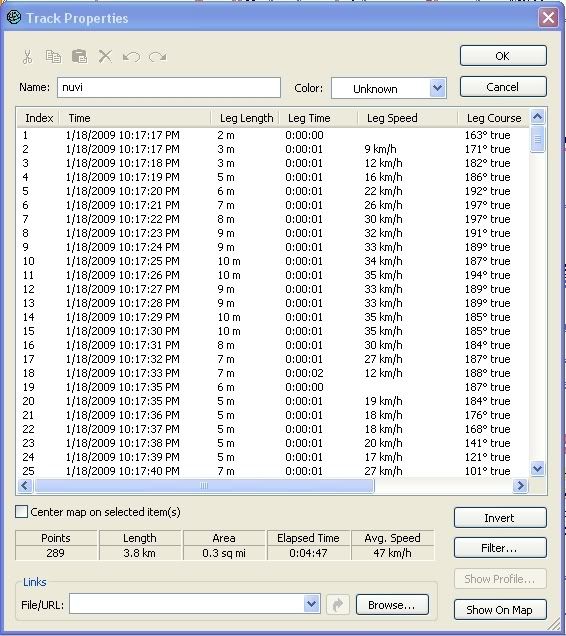
Oops! My mistake. That was the track properties of my Magellan handheld.
The Nuvi 200 is even better laying a track point every second but the downside is that it did not record the elevation/altitude. Here is a screen shot of the track properties:
The Nuvi 200 is even better laying a track point every second but the downside is that it did not record the elevation/altitude. Here is a screen shot of the track properties:
You do not have the required permissions to view the files attached to this post.
Lean not on your own understanding
-
9W2CBL

- Polygon Mapper
- Posts: 755
- Joined: Thu Sep 18, 2008 9:56 pm
- Location: Seremban (Nuvi 200, Nuvi 255W and Mobile XT S60)
- Contact:
Re: Activating hidden tracklog function in Nuvi 2xx
Well hopefully neadrenalin able to hack 255W Taiwan version as well! I be waiting for it to test on mine. I have mine US version n200 downgraded it to v3.40 and the track perform superb for about 1 year now.. currently upgrading to a wider screen.. but the tracklog carry by 255W doesn't perform as good as v3.40 n200 US version - I still love 1sec track on nuvi...
Looking forward for him to release it at GPSPassion!
Cheers!
Looking forward for him to release it at GPSPassion!
Cheers!
Common sense is instinct, and enough of it is genius
The avatar is design by Bro. Sulphur - Thanks!
Owned - nuvi200 (US Version), nuvi255W (TWN -> SGMY -> US -> TWN), Last MobileXT V5.00.60
The avatar is design by Bro. Sulphur - Thanks!
Owned - nuvi200 (US Version), nuvi255W (TWN -> SGMY -> US -> TWN), Last MobileXT V5.00.60
Re: Activating hidden tracklog function in Nuvi 2xx
does this able to do with 205w? as the trip log for garmin 205w is different with this track log. thanks~ 
Re: Activating hidden tracklog function in Nuvi 2xx
zom wrote:does this able to do with 205w? as the trip log for garmin 205w is different with this track log. thanks~
In my opinion, the tracklog feature of the 200W is better than the 205W trip log. In the 200W, at least I can have control when to start and stop the recording which can't be done on the 205W. The tracklog of the 200W is also more regular and consistent, as it provides 1 sec fixing interval.
I wish the 200W tracklog can leave a trace on the recorded track like the 205W.
However, nothing beats the track log of the handhelds.
Contribute exclusively to MFM. MSM don't get it !
Who is online
Users browsing this forum: No registered users and 30 guests