Page 1 of 2

How to contribute junction views to MFM

Posted: Tue Apr 28, 2009 12:53 pm
by edchuang (retired)
Hi All,

Okay. Let's start our junction view project, whether for papago or Garmin or other maps later on. For a start, we need Junction View Photo contribution for Major Expressway and Highway exit.

A simple guidelines:
1. Take the photo in a clear sky morning, better to be Saturday or Sunday where there is less traffic.
2. It is better to have a photographer and a driver in your car. Don't risk your life.
3. Set your camera setting to highest mega pixels photo.
4. Set your camera setting to Infinity/Landscape/Sport mode.
5. Drive on the lane next to the exit lane when approaching Junction.
6. Take one photo showing clearly the major Signboard.
7. Take another photo nearer to the junction.
8. Save the junction location with your gps unit/data logger. You might need to use mapsource to adjust your waypoint a bit to the exact junction location.
9. Save your picture using mfm standard file name:
E.g. MFMJV_524909_10047280_1
Where 524909 is Lat without decimal, 1004728 is Lon without decimal and 1/2 for the photo numbering.
10. Zip your picture files and PM to Antyong. If the file is very big, use free one-click hostings such as Megaupload to host your files and PM the link to Antyong.
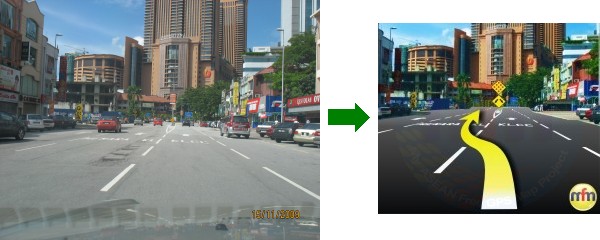
Example:
MFMJV_xxxxxx_xxxxxxxxx_1.jpg
MFMJC_xxxxxx_xxxxxxxxx_2.jpg


Happy Contributing. :tq:

How to draw MFM Junction View Picture.

Posted: Tue Apr 28, 2009 1:04 pm
by edchuang (retired)
Hi All,

If you are good with graphics and would like to help MFM draw Junction View graphics, we need volunteer graphics artists to convert our junction view pictures to graphics. Below is an example.
Image

Please follow the steps below:

Re: How to draw MFM Junction View Picture.

Posted: Tue Apr 28, 2009 3:13 pm
by sulphur
Nice and detail explaination for Coreldraw. For those IT savvy, the instructions can also apply to other similar software too.

It should be saved in RGB, not CMYK. For those stuffs that color related, I would prefer you give RGB values.

BTW, here is my small helping, template for some of the common use roadsigns

plus, the original mfm logo (already in transparency background)....

Re: How to draw MFM Junction View Picture.

Posted: Tue Apr 28, 2009 5:14 pm
by edchuang (retired)
sulphur wrote:Nice and detail explaination for Coreldraw. For those IT savvy, the instructions can also apply to other similar software too.

It should be saved in RGB, not CMYK. For those stuffs that color related, I would prefer you give RGB values.

BTW, here is my small helping, template for some of the common use roadsigns

plus, the original mfm logo (already in transparency background)....

Wow...Thanks a lot bro Sulphur. I will ammend the instruction accordingly. :thumbsup:

Re: How to draw MFM Junction View Picture.

Posted: Tue Apr 28, 2009 10:47 pm
by johnTan
Thanks bro edchuang for guideline.. :tq:
Just test using different painting software to draw the JV picture,
Is Sample below OK level ?

Re: How to draw MFM Junction View Picture.

Posted: Wed Apr 29, 2009 12:19 am
by johnTan
For night View JV,
How ? Is it OK level ? :mrgreen:

Re: How to draw MFM Junction View Picture.

Posted: Wed Apr 29, 2009 8:25 am
by edchuang (retired)
sulphur wrote:I have never use Coreldraw but normally in Illustrator I would do in 2D then pull everything into perspective view. This way the white lines in the middle of the road and the arrows would nicely angled. Not mentioning saves lot of time compared to trace one by one.

(e.g. The white lines - I draw a dashed line, convert to outline and distort to perspective)


Bro Sulphur,

Thanks for the inputs. :thumbsup: I will explore the Illustrator later on and if successful, will update the guides accordingly. Bro fancheng and me still exporing the perspective and distortion function in Coreldraw for easing the drawing efforts.

Thanks all for the efforts and appreciate continuous feedbacks especially all the graphics Sifus here.

:tq:

Re: How to draw MFM Junction View Picture.

Posted: Thu Apr 30, 2009 8:59 am
by edchuang (retired)
Hi All,

I had an interesting and fruitful meeting with Bro Sulphur yesterday night. While we concerntrating on photo contribution and JV drawings. Bro Sulphur will greatly involve in generic type of JV drawing for a start.

Bravo Bro Sulphur. :thumbsup:

Re: MFM Junction View Photo Contribution

Posted: Thu Apr 30, 2009 11:22 am
by edchuang (retired)
PM can accept up to <10Mb now. Kindly zip and pm your contribution to fancheng and edchuang.

If >10Mb, then email direct to both:

edmund1968@gmail.com
nac9031@gmail.com

:tq:

Re: How to draw MFM Junction View Picture.

Posted: Sun May 03, 2009 10:19 am
by sulphur
Photoshop is developed not for drawing, it is more toward photos editing, that is why Adobe comes up with illustrator (which is industrial standard). Other suitable softwares would be Micrografx Designer, Micromedia Freehand, Corel Designer, Corel Draw or any others that include vector drawing tools which usually in file formats of eps, ai, cdr, pdf, svg, vml....

However, never hurt to try and see the result.

-------------------------------------------

I just came home last night, and attached is my 15 minute work on one of the generic view (still try and error and the image is raw...).

As discussed with Bro Ed (respect la bro, a hardworking kind of guy... pity for your cute daughter to sleep on the lobby sofa), for the images to be different from other rivals, the generic images will be floating 3D junction views and with generic backgrounds (day & night).

Plus, a big gif image for mfm 3D Button (reduce the size at your will) to put at all your jv images...as I promised to edchuang.

We also need the talented guy (Nicholas) who draw "Mclaren F1 vehicle for Garmin' to help on 3D buildings. Hope once he is settle with his 'life', he can share some of his works.